Circle Generator Minecraft – Create Perfect Circles Instantly

Circle Generator Minecraft – Create Perfect Circles Instantly

Minecraft Circle Generator

Building smooth, symmetrical circles in Minecraft is one of the most common challenges builders face. Because Minecraft uses square blocks, circles often end up uneven, flat, or distorted—especially at larger sizes.

That’s why using a circle generator Minecraft tool is the smartest solution.

Our Minecraft Circle Generator Blueprint Studio lets you generate pixel-perfect Minecraft circles instantly, with full control over size, thickness, and alignment.

👉 Use the generator here:
🔗 https://calcifylabs.com/minecraft-circle-generator/

What Is a Circle Generator in Minecraft?

A Minecraft circle generator is a tool that calculates the exact block layout needed to form a visually accurate circle using square blocks.

Instead of guessing block placements, the generator:

  • Calculates pixel symmetry
  • Mirrors all sides perfectly
  • Eliminates uneven edges
  • Saves massive build time

This makes it ideal for towers, domes, farms, arenas, beacons, and mega builds.

How to Make a Circle in Minecraft (Without Guessing)

Manual method ❌
  • Count blocks by hand
  • Fix mistakes repeatedly
  • Time-consuming
Smart method ✅

Use a circle Minecraft generator.

Steps:
  1. Open the generator
  2. Select your circle diameter
  3. Choose outline or thickness
  4. Enable grid & center markers
  5. Copy the blueprint block-by-block into Minecraft

👉 Generator link:
🔗 https://calcifylabs.com/minecraft-circle-generator/


Minecraft Circles Explained (Beginner Friendly)

Minecraft circles are based on pixel circle patterns, where square blocks approximate a curve.

Important tips:

  • Odd diameters → true center block
  • Even diameters → center gap (great for doors & beacons)
  • Thick circles → ideal for walls & domes

You can explore detailed patterns and examples here:
🔗 https://calcifylabs.com/circles-in-minecraft-generator/


Pixel Circle Generator – Why Precision Matters

This tool also works as a pixel circle generator, ensuring:

  • Equal curvature on all sides
  • No flat edges
  • Perfect symmetry for large builds

Best use cases:

  • Domes & spheres
  • Circular mob farms
  • Colosseums & arenas
  • Nether hubs
  • Castle towers

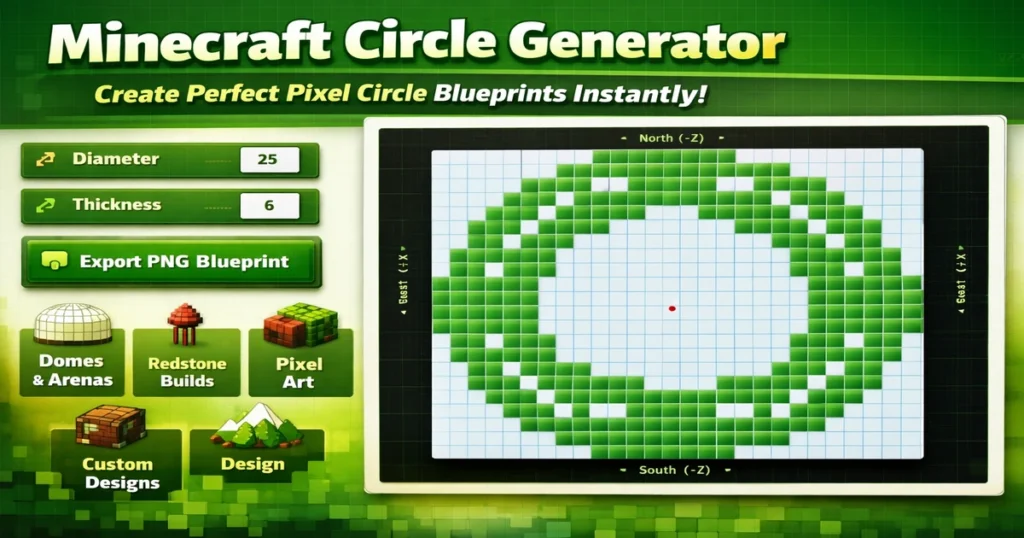
Features of the Minecraft Circle Generator

  • Adjustable diameter
  • Custom thickness
  • Zoom support for large circles
  • Grid & center toggle
  • Direction indicators (N / S / E / W)
  • Export blueprint as PNG
  • Works for Java & Bedrock

Common Minecraft Circle Sizes

Build TypeDiameter
Beacon base9–11
Small tower7–13
Medium dome21–31
Mega arena41+

All sizes can be generated instantly with the tool.

Trusted External Resource

For deeper Minecraft building theory and block mechanics:
🔗 https://minecraft.fandom.com/wiki/Building
(Educational, non-competitive reference)


FAQ – Minecraft Circle Generator Questions

What is a circle generator Minecraft schematic?

A Minecraft circle schematic is a saved blueprint that shows exact block placements for a circle. Our generator provides a visual blueprint that functions like a schematic without requiring mods.


Is there a circle generator Minecraft mod?

Yes, some mods exist, but they:

  • Require installation
  • May not work on all servers
  • Are version-dependent

A web-based circle generator Minecraft tool works instantly and is safer for all versions.

What is a Minecraft circle generator 3D?

A 3D circle generator is used for domes or spheres. Most 3D builds start with a perfect 2D circle base—this tool is ideal for that foundation.

Is there a Minecraft circle generator command?

Minecraft does not include a native command for circles. Commands like /fill only create squares or rectangles, so builders rely on circle generators for accuracy.

Can I use this as a pixel circle generator?

Yes. This tool functions as a pixel circle generator, calculating precise block placement for smooth curves using square pixels.

Is this a Minecraft shape generator?

Yes. While optimized for circles, it works as a Minecraft shape generator for circular bases, towers, and domes.

Does this replace Litematica circle generator?

If you don’t want mods, yes. This tool is:

  • Mod-free
  • Browser-based
  • Compatible with all versions

Litematica users still need accurate circle layouts—which this generator provides.

Is this similar to Plotz circle generator?

Plotz is a popular reference, but this tool offers:

  • Cleaner UI
  • Blueprint export
  • Zoom & grid controls
  • Faster usability for beginners

Final Words – Build Perfect Circles Every Time

If you searched for:

  • circle generator minecraft
  • minecraft circle
  • how to make circle in minecraft
  • minecraft circles
  • pixel circle generator

You’re in the right place.

🎯 Start building perfect Minecraft circles now:
👉 https://calcifylabs.com/minecraft-circle-generator/

Circles in Minecraft Generator: Perfect Pixel Circles [Free Tool] 2026 Guide

Circles in Minecraft Generator: How to Build Perfect Pixel Circles Easily

Minecraft builders often struggle with curved shapes due to the block-based grid system. A circles in Minecraft generator simplifies creating accurate pixel circles by calculating block placements mathematically. These tools enable precise minecraft circle blueprints for domes, arenas, and more.

circles in minecraft generator

Why Circles Are Difficult in Minecraft

The Minecraft world uses a cubic block grid where each block occupies one unit in x, y, or z coordinates. True circles cannot exist on this integer grid, resulting in pixelated approximations that appear blocky, especially at smaller sizes. Builders must approximate curves using discrete block positions, which requires understanding radius logic and symmetry to avoid irregular shapes.​

Pixel circles rely on algorithms like Bresenham’s circle algorithm to plot points closest to the mathematical circle equation on a grid. Without tools, manual plotting leads to errors, such as uneven quadrants or incorrect block counts. This grid limitation affects all structures, from simple rings to complex minecraft domes.​

How a Circles in Minecraft Generator Works

A minecraft circle generator computes block positions for a given diameter and thickness using pixel approximation math. It outputs a visual blueprint or chart showing filled or hollow patterns, often with block counts for planning. These generators handle odd and even diameters, adjusting for smoothness by prioritizing blocks nearest the circle’s edge.​

The logic involves iterating angles around the radius, snapping to grid points via distance formulas. For example, for a 20-block diameter, it places blocks where sqrt(x^2 + y^2) approximates the radius. This produces minecraft pixel circle charts ready for in-game transfer.​

How to Make a Perfect Circle in Minecraft Using a Generator

Step 1 – Choose diameter
Select a diameter like 21 or 39 blocks for smoother curves; odd numbers center easily.​

Step 2 – Generate blueprint
Use a Minecraft Circle Generator to input diameter and thickness, producing a pixel circle generator output.​

Step 3 – Mark center block
In-game, place a temporary block at coordinates (0,0) as the center reference.​

Step 4 – Build quadrant
Follow the blueprint’s first quadrant, placing blocks from center outward along the pattern.

Step 5 – Mirror symmetry
Copy the quadrant to opposite sides using world axes for perfect replication, reducing errors.

Step 6 – Verify radius
Measure distances from center to edge blocks; adjust outliers for uniformity.​

Choosing the Right Diameter and Thickness

Optimal diameters like 21, 39, or 50 blocks yield smoother minecraft pixel circles due to better grid fitting. Smaller circles (under 10 blocks) look jagged, while larger ones require more blocks— a 50-block circle needs about 157 blocks for the outline. Thickness adds realism; 1-block for outlines, 3-5 for walls.​

Use a minecraft radius calculator feature in generators to preview block counts and stacks. Even diameters work but may need offset centers. Test via minecraft circle chart for your build scale.​

Practical Uses of Circles in Minecraft Builds

Circles form bases for arenas, wells, and bases in minecraft structure planning. They enable curved walls in castles or tree domes for aesthetic landscapes. In redstone contraptions, precise circles create circular farms or piston rings.​

For mega-builds, stack circles into spheres using a minecraft sphere guide. Block grid circles enhance bridges and portals, improving immersion.​

Advanced Tips for Domes and Spheres Using Circle Layers

Layer scaling logic
Generate circles with decreasing diameters per height level using the equation radius_h = sqrt(r^2 – h^2) for sphere slices.​

Vertical alignment
Center each layer on the previous; offset by half-block visuals with slabs for smoothness.

Material planning
Calculate stacks via generator—large domes need thousands; gather in creative or survival prep.

Error prevention
Build quadrants first, mirror, then fill; use beacons for height reference.

Performance tips
Limit to 100-block diameters to avoid lag; build in chunks and light to prevent mob spawns.​

How Digital Calculators Improve Creative Accuracy

Digital tools like the Minecraft Circle Generator eliminate guesswork, providing exact blueprints for minecraft building guides. They integrate with planners like the Palworld Breeding Calculator for cross-game efficiency or Random Animal Generator for themed builds. Similarly, the Forge of Empires Calculator shows how precise math aids strategy games, boosting creativity across projects.

These calculators output rotatable views and exports, speeding minecraft dome building by 5x over manual methods. They ensure symmetry, vital for large-scale accuracy.​

What is the best circle generator for Minecraft?
Tools like pixel circle generators from Donat Studios or Calcify Labs excel for their accuracy and exports. They support large diameters and thicknesses without mods.​

How do you make a perfect circle in Minecraft without mods?
Generate a blueprint online, mark center, build one quadrant, and mirror. Verify with measurements from center.​

Why do Minecraft circles look blocky?
The 1x1x1 block grid forces pixel approximation; larger diameters reduce jaggedness.​

What is the best diameter for smooth circles in Minecraft?
21, 39, or 50 blocks; odd numbers center perfectly and fit grid math well.​

How many blocks are needed for a 50 block circle?
Outline uses ~157 blocks; filled adds interior based on thickness.​

Can I build spheres using a circle generator?
Yes, stack scaled circles vertically per height formula for domes.​

Does Bedrock and Java build circles differently?
No, both use same block grid; generators work cross-platform.​

How do I convert real radius to Minecraft blocks?
Round to nearest integer; use generator’s radius calculator for approximation.​

What is the fastest way to build large circles?
Print blueprint, use scaffolding for access, build quadrants symmetrically.​

Can I export circle blueprints?
Most generators offer PNG or command exports for direct pasting.​

Final Thoughts

Mastering circles unlocks advanced minecraft building guide techniques for professional structures. Practice with generators for efficiency. Experiment with diameters to match your vision.

What Is a Free ETG Calculator and Why It Matters 🍺🧪

What Is a Free ETG Calculator and Why It Matters 🍺🧪

A free ETG calculator is a web-based tool that offers quick estimates of how long alcohol can show up in urine through EtG tests.

Instead of measuring current drunkenness like breath or blood checks, this type of tracker examines waste products formed when your system processes ethanol.

These byproducts linger in urine far longer than alcohol stays in the blood — usually around 80 hours under normal conditions, though some people may exceed that window ⏳

Many individuals search for free ETG calculator options to better estimate how long alcohol may remain detectable in their system.

Common reasons include:

  • Tracking sobriety progress

  • Meeting legal or supervision requirements

  • Preparing for a job-related drug test

  • Understanding how their body processes alcohol

Instead of guessing, users can get instant estimates through web-based tools. One example is the ETG Calculator on CalcifyLabs, available at
👉 https://calcifylabs.com/etg-calculator/
It provides fast results without any cost 💻

For deeper medical explanations, trusted health sources like Medical News Today explain how EtG and EtS can remain detectable for up to 80 hours after drinking 🔬

How a Free Online ETG Calculator Operates 🧮

Using a free ETG calculator online requires a few basic inputs that affect alcohol metabolism.

First, you record the exact date and time when drinking stopped.
This sets the baseline for EtG clearance estimates and improves accuracy compared to guessing hours loosely ⏱️

Next, you enter the number of standard drinks consumed.
One standard drink contains about 14 grams of pure ethanol, such as:

  • 12 oz beer

  • 5 oz wine

  • 1.5 oz hard liquor 🍷

Body weight plays a major role because alcohol distributes into bodily fluids. People with higher body mass and more water content often show lower concentrations after drinking the same amount.

Gender also affects results, as males and females typically differ in body water percentage and metabolism speed ⚖️

Some advanced free ETG calculators allow users to choose a detection cutoff, commonly:

  • 100 ng/mL

  • 200 ng/mL

  • 500 ng/mL 📉

Within seconds, the calculator estimates:

  • Probable EtG concentration

  • Likelihood of passing a urine test

  • Estimated hours until EtG drops below the selected threshold

Many tools also use color indicators — green (pass), yellow (uncertain), red (fail) — for quick understanding 🚦

The Science Behind Your EtG Detection Window 🔍

To understand what a free ETG detection window calculator means, it helps to know how alcohol is processed in the body.

After consumption, ethanol is broken down mainly in the liver. Most alcohol exits quickly, which is why blood alcohol content (BAC) often reaches zero within about 12 hours.

However, less than 0.1% of alcohol converts into metabolites — mainly EtG and EtS — which linger much longer. These are what ETG tests detect 🧠

Research on individuals during alcohol withdrawal found EtG still present in urine around 78 hours on average, with ranges roughly between 40 and 130 hours 📊

Because results vary so widely, any free ETG calculator provides estimates, not guarantees.

Detection time depends on factors such as:

  • Liver health

  • Hydration levels

  • Body composition

  • Age

  • Medications

  • Overall health

People with liver conditions may test positive longer than calculators predict, while well-hydrated individuals with efficient metabolism may clear EtG sooner 💧


Using Your Free ETG Calculator Results in Real Life ⚠️

People search for free ETG calculator tools for many reasons.

For education and awareness, these tools are helpful.
Most calculators are accurate within 80–85%, but a 15–20% margin of error always exists due to biological differences 📉

For those in recovery or under monitoring, calculators help illustrate how even small alcohol use can remain detectable for several days.

However, professionals strongly warn against using calculators to plan drinking before tests. When sobriety is required, complete abstinence is the safest choice 🚫🍺

For legal, employment, or probation testing:

  • Calculators suggest outcomes

  • They do not guarantee results

  • Test methods, labs, and thresholds vary

When consequences matter, consulting a doctor, lawyer, or advisor is more reliable than relying solely on estimates ⚖️

Why Multiple Free ETG Calculators Exist 🔄

Different free ETG calculators often produce different results because they use different mathematical models.

Some assume faster clearance rates, while others estimate higher peak EtG levels 📐

Because of this, it’s smart to:

  • Check multiple calculators

  • Use the longest predicted window

  • Add extra buffer time

For example, if one calculator predicts clearance at 48 hours, waiting 60+ hours provides safer margin ⏳

Educational Value vs Medical or Legal Use 🎓

Free ETG calculators are excellent educational tools. They help users understand:

  • Why alcohol metabolites last longer than intoxication

  • How hydration and body composition affect detection

  • Why urine tests detect alcohol days later

However, calculators have limits:

  • They don’t know your liver function

  • They don’t account for medications

  • They may miss small exposures (mouthwash, sanitizer)

That’s why most tools clearly state results are estimates only, not professional advice ⚠️

Getting More Accurate Information 🧠

For clearer guidance beyond a free ETG calculator:

  • Doctors evaluate liver health and medications

  • Counselors assess drinking history

  • Legal advisors explain testing rules

  • Case managers outline program requirements 📋

Combining online ETG tools with expert advice offers the best balance — convenience plus accuracy 🌟

Understanding How an ETG Test Calculator Works 🍺🧪

Understanding How an ETG Test Calculator Works 🍺🧪

A test calculator for ETG helps guess how much ethyl glucuronide shows up in your pee after drinking alcohol.

Instead of checking breath like some tools do, this one zeroes in on leftover traces from booze – stuff that sticks around well past your last drink.

Thanks to its ability to catch those late signals, it’s often used in court cases or job-related checks. Some rehab plans even use these estimates so people can follow their own progress 📊

If you feel like trying different numbers yourself, check out an online tool – like the ETG Calculator over at CalcifyLabs: https://calcifylabs.com/etg-calculator/.

Want to know more about how EtG works inside the body or how accurate it really is? Head to PubMed Central, where real medical studies break down test results, including clear charts on reliability 🔬

The core idea of an ETG level calculator? It turns your drink details into a guess shown as nanograms per milliliter (ng/mL).

That number shows how much EtG’s in your pee; labs then check it against set limits – basing their call on that. If it’s above, you’re flagged positive ⚠️


The Core Inputs of an ETG Calculator 🧮

To get the most from an ETG test calculator, you’ll need to add info on how much you drink along with your weight and gender.

The initial input’s the number of typical drinks had. One usual drink equals 12 oz of beer – around 5% booze – or 5 oz of wine, which is close to 12% alcohol, otherwise 1.5 oz of hard liquor at nearly 40%, each holding about 14 grams of pure ethanol.

Logging a correct tally matters since overall alcohol weight kicks off any EtG prediction 🍷

Your weight plays a big role since alcohol spreads through water in your body, plus folks who weigh more typically carry more water to weaken the drink’s effect.

Sex makes a difference too – men generally hold more body water, say 60 to 68 percent, whereas women are nearer 50 to 55 percent, so they end up with stronger booze levels even when drinking the same amount ⚖️

Last of all, the hours you’ve been drinking along with when you had your last sip make up key details.

These timing bits let the tool guess how much booze got soaked in, broken down, turned into EtG, also how much left your body by now ⏱️


How the ETG Calculation Formula Works 📐

A math model sits inside each ETG test tool, turning your info into a likely EtG level.

It often begins with figuring how much booze you had – found by taking drink count times 14 grams of pure alcohol per serving.

Then, it figures out your blood alcohol level using a common method based on how much you weigh, if you’re male or female, also how much booze you had.

That part shows roughly how high your BAC got while drinking or right after 🍺

Once you’ve got the BAC number, the ETG tool turns it into a rough top-level EtG reading – usually by going with something like BAC times ten thousand to get nanograms per milliliter.

Then, it starts counting down from there using a typical drop rate, somewhere in the range of 100 to 200 ng/mL each hour, though most basic models go with about 150 to keep things simple 📉

The current guess for EtG is worked out using a basic formula

This guess gives you an idea of how much EtG might be left in your urine when you do the math.

Keep in mind – it’s just a rough simulation, not an actual lab test, so what happens in real life could vary ⚠️


ETG Cutoff Levels and What They Mean 🚦

Knowing ETG cutoff levels helps make sense of test results.

Some labs pick lower limits to spot even tiny alcohol traces, while others go higher to rule out accidental exposure.

Common thresholds include 100, 200, or 500 ng/mL – each balances detection differently. Choices depend on what matters more: catching use or reducing false alarms ⚖️

A 100 ng/mL limit catches even slight drinking over several days – it’s really responsive.

Instead of just spotting heavy use, it picks up around 85% of mild drinking after one day, dropping to nearly two-thirds after five.

For heavier intake, detection stays between 79% and 84% across those days.

But here’s the catch: because it’s so sharp, things like mouthwash or hand gel might bump levels past the line.

That means some positive results could be misleading – roughly 1 in 6 after five days aren’t from actual drinking 😬

The 500 ng/mL threshold shows up often in lab work, court rulings, or probation checks since it cuts false alarms way down – only about 3% over five days.

Even so, it catches most cases of serious drinking from the prior 24 hours.

That said, during day one, it spots just roughly 7 out of 10 light drinkers.

From day two onward through day five, detection slips below 58%, meaning low-level drinking might go unnoticed ⚠️

A 200 ng/mL threshold falls right in the middle of those two ends.

It’s sensitive enough – catching roughly 77% of light use and 81% of heavier use by day one – but still limits false alarms to just around 6% within five days.

Due to such variations, the limit set for your test might swing the outcome from negative to positive, despite having the exact same EtG level 🔄


Calculating EtG Levels Per Drink 🍹

A good way to understand an EtG level calculator is by checking usual EtG levels from various drinking amounts.

Studies along with real-world cases give rough ideas linking drink counts to probable EtG readings and how long they show up, even though each person’s outcome can differ 👤

A typical drink tends to give an EtG reading from around 100 up to 500 ng/mL, while traces in pee can show up for close to a day or even two

Having 2 or 3 drinks might get EtG levels between 300 and 1,000 ng/mL, while traces can show up for around two to three days after

After downing around four or five drinks, a person’s EtG might jump to roughly 800–1,500 ng/mL – or even higher – sticking around for up to three full days, sometimes past eighty hours

Binge drinking – downing six or more drinks fast – may push EtG levels past 1,500 up to 5,000 ng/mL; in some folks, traces might stick around nearly five days 🚨

These ranges show why an ETG test calculator never gives clear answers.

Because how fast your body works, how much water you’ve had, your liver’s condition, your kidneys’ performance – these things change EtG results a lot compared to typical numbers 🔄


Important Limitations and Accuracy of ETG Calculators ⚠️

Most ETG test calculators work like learning aids but only hit around 80–85% accuracy for guessing detection times under normal conditions.

Still, that means up to 1 out of 5 predictions could miss the mark – enough to affect big choices.

Your body’s processing speed might clear EtG 25% faster or slower than the standard guess, depending on personal factors.

Health issues can also shift how fast this substance exits your system 🧠

When you’re dehydrated, have liver trouble, kidney concerns, or take specific drugs, those things mess with results – and basic web tools aren’t built to handle such curveballs

One more issue? Calculators don’t account for everyday contact with alcohol.

Things like mouthwash or cough medicine might add tiny bits of EtG – so even snacks or regular hand sanitizer use could tip levels past a strict limit, say 100 ng/mL

Sure, studies show those background sources hardly ever hit stronger markers near 500 ng/mL.

But when tests are super sharp, it gets tricky to tell what’s really going on 🤔

Because of this, try using an ETG level calculator just to learn more – don’t count on it to predict if your lab result comes back clear or flagged.

If you’re dealing with a job drug check, a legal requirement, or being watched during rehab, talk things over with someone trained rather than trusting what the tool spits out 👨‍⚕️⚖️


Using Your ETG Calculator Results Responsibly ✅

Look at results from an ETG test calculator as clues about trends and timing – don’t use them to plan drinking before a test.

If you’re recovering, being watched by the law, or part of a testing program, skipping alcohol completely makes the safest choice since it wipes out guesswork on how long traces show up 🚫🍺

If you got a positive EtG result and aren’t sure what’s going on, talk straight away with someone who knows your situation – maybe your doctor, lawyer, parole person, or counselor.

Since every case differs, they’ll show you exactly which threshold applied, how much alcohol was said versus what showed up, along with why those figures matter for you personally.

Instead of guessing from web tools, getting help from a real expert brings clarity because automated systems – even smart ones such as CalcifyLabs’ ETG tool – can’t grasp personal details the way a trained professional can 🌟


Fence Installation Cost Breakdown

Fence Installation Cost Breakdown: Smart Budgeting & Hidden Fees 🕵️‍♂️

If you’re thinking about putting up a new fence, knowing exactly what goes into the price can save you from headaches later. Fence Installation Cost Breakdown shows why a fence isn’t just a quick buy — it’s more like choosing a secondhand vehicle than grabbing a morning drink, and that’s why costs often creep past the first quote.

Some web tools give vague estimates – leaving you confused, “Why does this cost so much more?” That’s what makes the Fence Cost Calculator from Calcify Labs different – it focuses on clear, step-by-step breakdowns. Rather than guessing, you’ll see real numbers for supplies, work fees, entry points, plus paperwork costs, helping you plan without stress.

Check it out here:
https://calcifylabs.com/fence-cost-calculator/

🧩 Where Does Your Money Go? (The Breakdown)

Once you type in your job info then click “Calculate” at Calcify Labs’ Fence Cost Tool, a neat round graph shows up – broken into sections. Every chunk stands for one big piece of your spending plan.

🔵 Stuff used (around two-fifths to half of everything)

This here’s every bit of material that’ll turn into your fence.

The body: posts, rails, or panels – they shape how your fence looks and holds up. Prices usually run between $10 and $45 a foot for basic types made of wood, vinyl, or chain link, based on design and durability

The guts: use concrete to secure posts firmly – when soil’s rocky or loose, extra mix helps hold things steady

The Bling: Bolts, fasteners, supports, covers, or locks – stuff that keeps it all in place while giving a clean touch. Little pieces like these pile up quicker than you’d think

🟢 Labor (Often Another 40–50%)

This is why you hire experienced pros – to spare your time, ease the strain on your body, also protect your yard work.

Digging: Post holes should go 2–3 feet down – clay or rocks make digging way harder, slowing things down. Fence pros usually charge $5 to $15 a foot, though price jumps if the ground’s rough or materials get tricky

Crews put up posts neatly – keeping them flat and steady so your fence stays strong against storms or gusty days, not tipping sideways.

Cleanup: Taking out trash plus making sure your yard’s ready to use post-install – this often comes with labor costs, not billed on its own

🟣 Gates (The Sneaky Extra)

Gates usually end up pricier than folks think. Not simply a tiny fence part – more like an added feature that boosts expense

Thicker posts help hold things up, more concrete adds stability, stronger frames keep shape, while better hinges plus solid latches stop drooping later on.

A basic walk-through gate might cost just a few hundred bucks, whereas bigger ones for cars – built tougher or styled up – can run into the thousands.

For this reason, every extra gate might clearly raise your overall cost. Cutting down gates – while keeping things easy – can simply help you stick to your limit.

🟠 Permits & Red Tape

Many towns need approval before putting up fresh barriers, particularly by borders or close to roads.

Fence permits usually don’t cost much when stacked up against the whole job – yet folks often overlook them. Most places ask for somewhere between $20 and $150 to approve a typical home fence

Some areas might need checks for height, where it’s placed, or if it’s safe – these bits can bump up the price a little

The Calcify Labs tool adds a “Permits/Misc” section – so surprise document costs won’t hit when it’s too late.

⚠️ The “Gotcha” List: 4 Hidden Fence Costs

Even the best fence installation cost breakdown tool can’t see underground roots or buried surprises in your backyard. These are the most common hidden costs you should have on your radar before signing anything:

Hidden CostWhy It HappensTypical Impact on Budget
🪵 Old Fence RemovalCrews must demolish and haul away existing wood or chain link fencing.Often $3–$5 per linear foot for removal and disposal.
🌳 Tree/Bush ClearingTrees, shrubs, or heavy brush sitting on the fence line must be trimmed or removed before work starts.Cost varies widely based on size and access; can add a few hundred dollars or more.
⛰️ Slope & GradingBuilding on sloped or uneven ground requires extra digging, stepping, or racking panels, and sometimes re-grading.Can increase labor by 10–20% or require separate grading work.
💧 Utility LinesSprinklers, invisible dog fences, or private utility lines may need to be rerouted to avoid damage.Often requires a specialist or separate contractor, adding another line item.

Being aware of these “gotchas” lets you pad your budget appropriately instead of scrambling later.

🧠 How to “Reverse Engineer” Your Budget with the Calculator

The true strength of the Calcify Labs Fence Cost Calculator? You tweak numbers till the price fits what you’ve got to spend. Try this basic move:

Dream Big First

Begin by picturing your dream setup – like 200 feet of top-grade vinyl fencing plus a pair of gates. Plug in those numbers then hit Calculate over at:
👉 https://calcifylabs.com/fence-cost-calculator/.

Check the Damage

Check the Total Estimated Cost along with the donut chart. When it feels too high, spot which parts – like materials or labor – are taking up most of it. On average across the country, these kinds of jobs usually run from a few grand to many thousands, based on how big they are and what’s used

Start Tweaking the Big Levers

Switch material from premium to standard – or go from vinyl to treated wood. That’ll cut costs per foot right away

Lowering height from 8 ft to 6 ft cuts down on materials – often saves time during install – not much less private though.

Gates: Think – do you actually need several entry spots, or would a single smartly positioned one work just fine?

Find the Sweet Spot

Tweak things till the sum matches what you’ve actually got to spend. This tool shows a solid baseline, which means when you chat with pros about estimates, you’ll spot if their numbers make sense – or don’t

On top of that, tools such as Angi’s price lists give a clearer picture – showing what folks usually pay per foot or on average nationwide, depending on fence style and location – so you’ve got something solid to compare when using your own quote tool

🙋‍♀️ Frequently Asked Questions (FAQ)

Q: Need a cheap fence on a tight budget? Here’s the most affordable choice.
A typical galvanized chain link barrier often costs less per foot for many yards, yet keeps areas secure. Where hiding views counts – but cash doesn’t stretch far – basic pressure-treated timber setups generally offer solid bang for the buck

Q: Why do gates feel pricier than the rest of the fencing?
Gates use thicker posts, tougher fittings, or tighter workmanship. If a gate’s put together badly, it’ll droop, scrape the dirt, or fail to shut right – so fitters add support where needed. This added effort along with sturdier parts explains why even a simple gate can push up the overall cost

Q: Does the price on the calculator mean it’s set?
A guess that’s pretty smart – uses common prices, usual pay for workers, plus normal land stuff. Most of the time it matches what pros would say, yet only checking live shows real problems like big roots, stones, or tight spots to reach

Q: Is it cheaper to put fence poles further apart?
Going wider than the typical 6–8 feet between posts usually backfires. Rails tend to droop when spaced far apart – more so if wind hits or extra load piles on – which means your fence won’t last as long and could mean pricier fixes later. Keeping it standard isn’t just common advice – it holds things together right

To get a quick guess on how much fencing might set you back, try punching your details into the tool at Calcify Labs – check it out here:
https://calcifylabs.com/fence-cost-calculator/.

Once you’re up for looking into different builds or checking out other tools, just swing by the main page whenever at:
https://calcifylabs.com/


Wood, vinyl, or chain link – which wins the race? 🏆

Wood, vinyl, or chain link – which wins the race? 🏆

Picking a fence kind of reminds you of shopping for tires. That shiny option catches your attention – yep, bright white vinyl (sure looks nice 😉) – but your wallet whispers to keep it simple… maybe stick with trusty chain link.

It’s an old-school showdown – looks against cash, toss in grind, perhaps how much you’re driven to keep winning.

If you’re unsure about which way to go – yep, that’s right 😂 – this breakdown gives a hand. Because we pulled data from our Fence Price Tool, options appear side by side without fluff. So here’s how each stacks up for what you actually need!

🌲 Contender 1: Wood Fencing (The Classic)

Wood’s a bit like your go-to sneakers – never outta fashion, fits just right, yet somehow ties everything together.

The feel? Down-to-earth, cozy – sort of hidden away too.

The cost? Kinda mid-range – about fifteen to thirty dollars per foot.

The real deal? Keep up with it, no doubt. 🖌️ Skip sealing once in a while – starts looking dull, could start breaking down later on.

Fair heads-up: works real well if you like vintage vibes – just as long as you’re cool with helping out now and then. Yeah, it needs some effort, no doubt, yet folks still dig what it offers – give it attention here and there whenever things slow down.

✨ Contender 2: Vinyl (PVC) Fencing (The Modern Marvel)

Vinyl’s showing up neighborhood after neighborhood – honestly, makes total sense. Works kind of like a fence version of a cellphone: smooth look, no fuss, super simple to handle.

The sensation? Airy, clean – basically ideal.

The cost? High – ranging from twenty to forty dollars per foot.

The problem? Hits your wallet fast. 😬 Since when a limb drops and splits part of it, swapping only that piece won’t work – whole chunks need replacing.

Fine print: Works well if you’re happy to spend more today just to skip painting forever.

🔗 Contender 3: Chain Link (The tough Guy)

It’s ugly, sure – yet somehow works quick.

The feel? Tough, no-frills construction. A solid layout – still offers strong protection.

The cost? Super low – just 12 to 25 dollars per foot.

The tough bit? No privacy at all. So when you’re barbecuing in your PJs, folks nearby get a full view. 🍔 That said, tossing up some cheap plastic wrap could work. Real talk – it kinda screams retro ’90s vibes.

A decent choice if you want to keep your dog in place without spending much. Simple? Yeah – yet it works fine when cash is low.

🥊 The Showdown: Side-by-Side Comparison

Wood vs Vinyl Fence Cost


💡 How to Compare Costs Like a Pro

Stop guessing – check how it hits your cash. Try this trick through our Fence Cost Calculator now.

Start off by noting how big your yard is – say, 150 feet – and slip in details about the gate while you’re at it.

Try it out – pick “Pressure Treated Wood,” then press Calculate. Jot down the result. Note it down straight away.

Select “Vinyl” this time – tap Calculate once more right away.

The bulb lights up when you line them side by side. Most times, vinyl runs nearly a third pricier than wood. Think it over – skimping fifteen hundred bucks now might lead to fresh paint on your porch yearly for two decades.

(Spoiler: Lots say yes – looks like they really mean it!)

🙋‍♂️ Frequently Asked Questions (FAQ)

Why’s vinyl so pricey now?
A tough plastic built to handle sun, storms, or cold – lasts season after season. What really matters? Smart design combined with long-term toughness.

Q: Which fence lasts the longest?
A: Metal grid or plastic layer? One might last way past our time – pretty much doesn’t quit. 🧟‍♂️ Wood, though, quits later down the road, cracks under wet and heat, typically bites the dust in 15 to 20 years, depends where it’s sitting.

Q: Can this work with various kinds of wood?
A: Yep! Swap from “Standard” (Pine) to “Premium” (Cedar) anytime you like. Cedar smells good, while keeping bugs away. Still, it runs around 20% pricier.

Q: Can I install these myself?
A: Sure, it’ll do the job – though nailing every detail? Harder than you’d think. Should the barrier tilt, folks next door could get curious. 😉

Want to compare more costs? Visit our tools at Calcify Labs.


The Ultimate Guide to Estimating Fence Installation Costs

🧱 The Ultimate Guide to Estimating Fence Installation Costs

Putting up a new fence? It’s thrilling – gives you more privacy, keeps things safer, plus makes your place look better from the street. But here’s where folks get stuck: cash. They wonder, “What’s this gonna run me?” Thing is, there’s no one-size-fits-all number. Price swings based on what it’s made of, how many feet you’re covering, what workers charge nearby, or if you want extras – say, an entry gate.

Skip the guesswork – or endless waits for contractor replies. Our pro Fence Cost Calculator spits out a spot-on quote in no time, built just for your setup. We’ll break down what shapes the price tag, step by step. See exactly how fast you can land a solid figure.


🔑 Key Factors That Influence Fence Installation Costs

Knowing what affects the cost can make a difference before you try the tool. Usually, pros split their estimates into two parts – materials or work involved.


1️⃣ Material Selection

The stuff you pick affects how much it costs per foot more than anything else.

Chain Link: Usually runs from $12 to $25 a foot – cheap upfront, tough enough to last, good at keeping people out; however, it doesn’t block views much.

Wood’s a go-to for keeping things private. Pressure-treated pine? It’s cheap – runs $15 to $30 each foot – but doesn’t last forever. Go for cedar or redwood if you want something tougher against rain and sun, though it’ll set you back $25 to $35 or more per foot.

Vinyl’s tough stuff – sticks around a while, looks like wood but won’t decay. You’ll probably spend $20 to $40 each foot.

Aluminum or steel? Fancy choices built to last, looking sharp – usually costs between thirty and fifty bucks a foot, sometimes more.


2️⃣ Fence Height and Length

More stuff means spending more cash. Most home fences stand at 6 feet tall. Bump it up to 8 for better seclusion, but get ready – materials jump in price while posts must toughen up against gusts. The full stretch you’re covering, foot by foot, sets how much the basic materials’ll actually run you.


3️⃣ Labor and Installation Complexity

Labor usually makes up around half the overall project price. When your land’s got slopes, hard ground, or stuff in the way – say, trees or old fences needing clearing – the work gets pricier. Instead of guessing, our tool pulls live market numbers to figure out typical pay rates on its own.


4️⃣ Gates and Hardware

Remember entry spots! One regular pedestrian gate runs about $200 to $400. But if you need space for cars, a wider two-way version might hit $400 to $800 – or even higher – based on how big it is or what it’s made of.


🧮 How to Use Our Fence Cost Calculator

We built this tool so it’s easy to use yet super quick. No need to work in construction just to land a top-quality quote. Stick to these six basic moves:

Pick a fence type by picking your favorite material – like pressure-treated wood, vinyl, or chain link – and go standard or premium depending on what you want.

Put in how long your fence is, using feet. After that, pick how tall you want it – usually between 3 and 8 feet high.

Pick how many single or double doors you want – this way, tools and extra work time get added to your price. It’s smart to list it now so no surprises come later.

Put in your ZIP code if you want – it helps fine-tune the result. That way, it matches what things cost where you live, like how much workers charge or what materials run these days.

Tap the button → watch your info get sorted fast.

Check cost details: See a quick pie graph plus a breakdown listing what you might pay for supplies, work hours, entryways, or paperwork.


❓ Frequently Asked Questions (FAQ)

Q: Does this fence price tool get it right?
A: Our tool gives guesses pretty close to what pros would charge – usually within 15–25%. Instead of fixed numbers, it pulls current material prices live plus blends in typical local pay for workers. But if your yard’s got quirks – say, sharp hills or tough dirt – that could shift the quote once a pro shows up.

A: Labor expenses – do they count them in?
A: Yep. That full price tag includes stuff you need plus the work it takes to put it together. Check out the “Cost Breakdown” part to spot how much goes to supplies versus hands-on help.

Q: What is the cheapest fence to install?
A galvanized chain-link fence usually costs less for homes. On the other hand, pressure-treated wood gives privacy at a low price.

Q: How do I calculate how many posts I need?
A: Fence posts usually sit 6 to 8 feet apart. Try dividing the full fence span by 8, then toss in one extra post. So, for a 100-foot stretch, you’re looking at about 13 or 14. The tool does that number crunching on its own – just head to “Project Details.”.

Q: Is a permit required if you’re putting up a fence?
A: Pretty much every town needs a permit when putting up a fence. Fees tend to run between $50 and $150, but it changes by area. The tool we built adds a rough estimate under “Permits/Misc” so you can plan ahead.

How to Use Google Nano Banana Pro for Free: The Complete 2025 Guide

How to Use Google Nano Banana Pro for Free: The Complete 2025 Guide

Google Nano Banana Pro represents a breakthrough in AI-powered image generation, leveraging the advanced Gemini 3 Pro reasoning engine to create studio-quality visuals with unprecedented precision and creative control. 🚀
Released in November 2025, this sophisticated image model has transformed how professionals, entrepreneurs, and content creators approach visual asset creation.

However, understanding how to access and maximize this powerful tool—especially for free—requires navigating multiple platforms and understanding the nuances of each access method.
This comprehensive guide walks you through every viable strategy to use Google Nano Banana Pro without paying for premium subscriptions, while delivering enterprise-grade results for your projects. 🎨✨


🔍 Understanding Nano Banana Pro: What Makes It Different

Nano Banana Pro isn’t simply an incremental update to its predecessor—it’s a generational leap in AI image generation technology. ⚡

At its core, Nano Banana Pro excels through several architectural innovations.

Advanced text rendering engine
Google Search grounding mechanism
Native 4K resolution
Professional-grade creative controls

These features unlock powerful possibilities including multilingual text, factually accurate visuals, 16MP output, and consistent character design — all within seconds. 🖼️💡


🆓 The Real Truth About Free Access: Breaking Down Your Options

Google markets Nano Banana Pro as offering “free-tier access,” but the reality involves multiple layers. Here’s how each free path works:

📱 Gemini App Free Tier

  • 3–4 low-res image generations
  • Resets every 8 hours 🔄
  • Reverts to older model after quota

🧑‍💻 Google AI Studio with Billing Enabled

  • $5–$300 free trial credits 💳
  • Approx. $0.15 per 4K image
  • 33–2,000 free generations

🎬 Flow Platform Free Trial

  • Most generous free option
  • 1 month free
  • 1,000 AI credits

🌐 Integrated Platforms

  • GlobalGPT, OpenRouter
  • Often larger free quotas

📘 NotebookLM Integration

  • Built-in image generation for some tiers

🏢 Vertex AI Trial Credits

  • $300 enterprise trial

🧭 Step-by-Step Guide: Accessing Nano Banana Pro Through Gemini

1️⃣ Navigate to Gemini

Visit gemini.google.com or use the mobile app.

2️⃣ Locate the Image Generation Feature

Tap “Create images.” 🎨

3️⃣ Select the Thinking Model

Choose “Thinking” to activate Nano Banana Pro. 🧠

4️⃣ Craft Your Prompt

Keep it under 25 words for best results.

5️⃣ Generate Your Image

Wait 10–30 seconds ⏳

6️⃣ Refine and Iterate

Use quick edit commands like:

  • “Add red umbrella” ☔
  • “Change to golden hour lighting” 🌅

⚙️ Advanced Free Methods: Maximizing Your Usage

🔥 Use Flow’s one-month trial efficiently
🔥 Combine multiple free tiers
🔥 Track Google AI Studio credits
🔥 Time your Gemini resets at 8-hour intervals


💼 Practical Applications: Real-World Use Cases

✨ Content creation & social media
✨ Product visualization & e-commerce
✨ Educational graphics
✨ Website UI/UX images
✨ Film pre-visualization & storyboards

Nano Banana Pro’s capabilities shine across professional environments.


🎯 Optimization Strategies: Prompting Like a Professional

✔ Use cinematography terms
✔ Specify lighting precisely
✔ Activate search grounding
✔ Refine iteratively
✔ Control resolution & aspect ratio


🛠 Common Challenges and Solutions

❗ Free quota exhausted → Use lower resolutions
❗ Output mismatch → Refine prompts
❗ Text errors → Specify exact wording
❗ Account issues → Enable 2FA


⚖️ Comparing Nano Banana Pro Against Competitors

Midjourney = Artistic
DALL-E 3 = Ecosystem integration
Stable Diffusion = Open-source control
Nano Banana Pro = Reasoning + accuracy + text + 4K


🔮 Future Roadmap and Emerging Possibilities

Google will expand free tiers, deepen workspace integration, and enhance enterprise controls — making Nano Banana Pro the future AI image standard. 🌐


🏁 Conclusion: Maximizing Value from Free Access

By combining Gemini daily access, Flow’s monthly trial, AI Studio credits, and third-party integrations, you can generate hundreds of high-quality images for free.

Master its capabilities now to amplify your productivity and competitive edge. 💼🚀


🔗 Related Resources

Review Google’s official Nano Banana Pro documentation for updates.


🌟 Start Your Free Journey

Explore your creative potential with Calcify Labs Calculator — where precision meets innovation at:
https://calcifylabs.com/


 Medication Adherence Best Practices | Never Miss a Dose With Proven Strategies

Medication Adherence: Best Practices to Never Miss a Dose

Consistently taking medications as prescribed is crucial for health and recovery—but studies show that up to 50% of adults miss doses or stop medications early. Improving medication adherence is proven to boost health outcomes, reduce complications, and decrease hospital visits. Here’s how to master adherence with proven strategies:​

1. Set Up Automatic Prescription Refills

Enroll in your pharmacy’s automatic refill program so you never run out of your essential medications. Most pharmacies notify you by text, app, or call as soon as your prescription is ready. This reduces the risk of missed or late doses and streamlines your medication management.​

2. Use Pill Organizers and Smart Packaging

Pill organizers (weekly/monthly pill boxes) and prescription blister packs make it easy to keep track of multiple medications and times. Studies confirm that patients using pill organizers are less likely to forget doses compared to those managing loose bottles.​

  • Choose organizers with daily or time-of-day slots.
  • Consider electronic pillboxes with alarms or smartphone connectivity for extra reminders.

3. Sync Multiple Medications

If you take several medications, ask your pharmacy to “med sync” them so all prescriptions can be refilled and picked up together. Medication synchronization saves trips and supports adherence by reducing confusion and simplifying routines.​

4. Leverage Pharmacy and Medication Reminder Apps

Mobile apps can track your dose schedule, send you reminders, and alert you when it’s time to reorder. Some top pharmacy apps even offer refill requests, medication counseling, and medication interaction checks, all from your phone.​

  • Look for apps that allow personalized reminders, refill tracking, and integration with your pharmacy.

5. Create a Consistent Routine and Set Visual Cues

Link medication times with daily habits—such as brushing your teeth or eating a meal—to build a healthy routine. Place medicine in a visible spot linked to a regular activity (but out of reach of children).

6. Tap into Digital Tools for Calculations

Unsure when your next dose or refill should be? Use the Prescription Refill Calculator by CalcifyLabs to figure out your exact schedule and keep your therapy on track.

7. Communicate with Your Healthcare Team

Strong relationships with your doctor and pharmacist improve adherence. Don’t hesitate to ask questions, voice concerns, and discuss side effects or cost issues. Providers can suggest alternative treatments, adjust prescriptions, or recommend adherence solutions that fit your lifestyle.​

8. Remove Barriers— Financial, Side Effects & Forgetfulness

  • Ask about generic alternatives if costs are high.
  • Discuss side effects promptly for quick adjustments.
  • Use reminders like alarms or sticky notes if forgetfulness is a concern.

Proven Impact of Medication Adherence

Research shows that high adherence rates are linked to better blood pressure, diabetes, and cholesterol control—and ultimately to fewer complications, emergency visits, and better quality of life. Even small improvements in adherence can deliver major health benefits.​

For more tips, read the CDC’s guidance on effective medication adherence strategies for patients and caregivers: CDC – Improving Medication Adherence.

Days Supply Calculator for All Medication Forms | Accurate Pharmacy Formula & Examples

Days Supply Calculator for All Medication Forms: Accurate Formulas and Real-World Examples

Mastering the days supply calculation for all medication types—tablets, liquids, inhalers, and injections—is essential for pharmacy professionals and patients alike. Mistakes can lead to insurance rejections, dosing errors, or medication shortages. This guide explains the step-by-step formulas with real-life examples, plus smart tips every pharmacy technician should know.

What is Days Supply? Why Is It Important?

Days supply refers to the total number of days a prescription will last based on how it should be taken. Insurance companies, pharmacies, and patients all rely on accurate days supply numbers to ensure proper treatment and refill timing.

Days Supply Calculation Formulas for Every Medication Type

Tablets & Capsules

Days Supply=Total Tablets or CapsulesTablets per Dose×Doses per DayDays Supply=Tablets per Dose×Doses per DayTotal Tablets or Capsules

Example:
Prescription: Amoxicillin 500mg, 1 tablet 3 times a day, dispense 30 tablets
Calculation: 30 ÷ (1 × 3) = 10 days’ supply


Oral Liquids

Days Supply=Total Volume (mL)Dose Volume (mL)×Doses per DayDays Supply=Dose Volume (mL)×Doses per DayTotal Volume (mL)

Example:
Prescription: Cough syrup 5mL twice daily, dispense 100mL
Calculation: 100 ÷ (5 × 2) = 10 days’ supply


Inhalers & Nasal Sprays

  1. Find the total number of metered doses per device (listed on the label).
  2. Calculate maximum daily usage.
  3. Divide total doses by daily doses.

Example:
Inhaler with 200 puffs, directions: 2 puffs 3 times daily
Calculation: 200 ÷ (2 × 3) = 33.3 days’ supply (round down to 33 days)


Injections, Creams, and Other Forms

  • Injections:
    Days Supply = Total quantity dispensed ÷ (units per dose × doses per day)
    • Example: 10 vials, each dose uses 1 vial per day = 10 days’ supply
  • Creams/Ointments:
    Days Supply often estimated by daily amount used. For eye/ear drops, check drops per mL and usage instructions.


Real-World Tips from Pharmacy Technicians

  • Always verify instructions for “as needed” (PRN) prescriptions—calculate using maximum allowable use.
  • Double check manufacturer packaging for device-specific doses (especially inhalers and nasal sprays).
  • For insurance billing, never round up—use whole days based on full doses only.
  • Keep a calculator handy, or use digital tools for quick, accurate results.

Try the easy Prescription Refill Calculator by CalcifyLabs for instant days supply calculations and refill planning!


Why Days Supply Calculations Matter

Accurate calculations prevent prescription denials, help patients avoid running out of critical medications, and support safe, compliant pharmacy operations. Understanding these formulas is crucial for exams, job performance, and quality patient care.

For additional details and downloadable pharmacy study guides, see this comprehensive pharmacy technician days’ supply calculation PDF from the Illinois State Board of Education.

Quick Reference Table

Medication FormCalculation FormulaExample
Tablets/CapsulesTotal tablets ÷ (tablets per dose × doses per day)30 ÷ (1 × 3) = 10 days
LiquidsTotal mL ÷ (mL per dose × doses per day)90 ÷ (5 × 3) = 6 days
Inhalers/SpraysTotal puffs ÷ (puffs per dose × doses per day)200 ÷ (2 × 4) = 25 days
InjectionsTotal vials ÷ (vials per dose × doses per day)14 ÷ (1 × 1) = 14 days